Saturday, July 23, 2011

The year of extremes continues

  1. Extreme snowfall this winter.
  2. Extreme rainfall this spring (almost every single day!)
  3. Extreme heat last week and coming again this week.
  4. Early this morning, extreme rain.  The largest rainfall ever recorded in Illinois.  We got 7.25 inches on my raingauge.
Know whats not fun?  Digging in goo.  Know what is less fun.  Putting up a deck in 90 degrees with 90% humidity.  It rained off an on today.  Didn't matter.  We were soaked when it was raining and soaked when it wasn't.  Oh well still better than drought and locusts and dust storms and wild fires!

Sunday, July 17, 2011

Landscaping the New Area Starts-Sort of

 If you had told me earlier in the year that the mid-point of the patio project would occur with the first tomato, I would have been OK with that.  Now it is here.  That patio midpoint and the first tomato.  

Galinas cherry started giving up her goodness last week.  Oh man these little cherries are delicious.  Not sweet.  Very old tomato flavor.  Very rich and very prolific.  The plant is huge, well over ten feet and very easy to keep in a reasonable shape.  

I'm supposed to be talking about landscaping though so I'll conclude my tomato ramblings with the whine that tomato season is a full three weeks behind, thanks to the horrible spring.  Oh well, at least it has started!

The fence is almost done, they are having trouble with one of that latches because they undersized the gate opening a full inch.  (Le sigh) .  This would normally start me on a contractor rant but its already 85 degrees out there and I have a deck to build.

  Focus on the pictures Stacy..  Right

Well this bed is done.  It was an interesting bed to do because it is deep shade on the far left and full sun on the far right.  The goal was to have four season interest, very low maintenance and some color.

The solution I came up with was was Stained Glass hosta on the far left in chartreuse and dark green,  some really glowy double knock out roses in the center and  a chartreuse and dark green dwarf cypress with interesting texture in the right.  I completed it with some shiny black ajuga, which should be easy to contain in this area near the hosta and then some dark purple salvia for the front.  The salvia are just filler.  I wanted the stars of the bed to be the glowers.  It looks underdeveloped right now, but I think once the hosta gets a bit bigger it is going to be nice.  I like the balance the different glowy greens is giving it.

Today the goal is to finish the balcony.  It is predicted to be a rather miserable job.  It is tropical out there right now and we have learned that while beautiful, Timbertek decking is hot!  We spent a good chunk of yesterday putting in the decking boards.  Today is the railings which are complex enough that they provide a video to supplement their written instructions.  


The next landscaping project at the deck is to landscape this area.  I call it the balcony bed.  This area is challenging for a whole lot of reasons.  The deep shade under the deck, the dog loving this area, the need for a four season view since the foyer looks right on it, the horribly compacted clay that has been tramped down in it, and most puzzling of all, the question of what to do on the end.


The end currently has grass in it.  The grass has to go because there is now way to reach it with the mower now that the fence is in.  What I want to do is tie this new bed in with the existing back bed.  However I don't want to completely re-do the back bed.  I also am struggling with the big bulbous blog at the end of a narrow bed that is going to occur if I don't.

I've decided to start on the easy (Ha!) edge of the bed and then work back.  Meanwhile every evening I sit out on the new patio with my tea and plot what the plan is going to be for this area. 

I'll save the challenges for this area for another day.  They are not only aesthetic and functional issues but also mechanical and technical.  It's requiring a whole lot of research.  
That's it for now, the deck calls.

Saturday, July 2, 2011

FINALLY! Project Starts

As predicted, the whole permit thing took a month.  Really though even without permits it would probably have taken that long to get started due to the bleeping rain every single day since the snow went away!

Finally last week, we got a break.  We got back from vacation and the permits were ready, the weather was cooperating and the contractors were ready to go.  Time to purge the ugly!


It took about five minutes of ugly purging to figure out that things were going to get a whole lot more ugly before the pretty started.  

Excavation went really fast, but those giant piles of clay that got dumped all over my nice soft, lovely black soil, well that smarted.  We agonized over cutting some tree roots from the sugar maple, coaxed the dog that different grass was still OK and mostly tolerated a whole lot of mud and dust.  Yeah dust.  Who knew brick pavers were so dusty?

The bad pain was pretty darn short though.  OK the wallet still stings but the ugly fence is out, most of the pavers are in, the seatwall is in and we are starting to get some glimses of what is to come.  Yeah yeah, the deck is still rotten, the beds are still filled with giant clay mounts and the dog still is freaking out, but we are definitely making some progress!

I might even go to a nursery today!
I'm rather freaking out about the new giant bed that has been created and what to put in it.  The back berm bed is infested with weeds.  I'm having trouble keeping up with the existing beds and now there are two new ones and more to come!  Hopefully when I no longer have to relocate clay piles, that will free up more time for weed control.  In the meantime, the plan is lots of landscaping fabric and mulch!

Friday, May 27, 2011

Two Steps Forward...

The season of no progress continues!

Last weekend I spent a fair amount of time getting most of the tomatoes and peppers in the ground and getting mulch down in the foundation planting bed.  While doing this, I occasionally heard a strange sound...almost like two sticks being rubbed together.

It turns out, that is exactly what it was.  The maples in the yard, no doubt peeved that I have started planting hosta's in their root zones were plotting against me.  It couldn't have been two hours after the time I got the last bag down when a gentle breeze picked up, and the maples took their revenge.

The picture below was taken before the subsequent storm hit, which not only dropped 29834729 more maple seeds, but also planted and watered them nicely.
What this means is that this weekend, I get to spend more time on this same bed, getting up the propellars before they sprout and make their evil maple roots.

Unfortunately, this is not the only bed that has been attacked.  They all got nailed, along with the gutter covers.  You know those things that are supposed to keep  stuff out of the drainpipes by embedding them in mesh?  yeah

The original plans for the weekend were supposed to surrounded recovering the balcony in the patio with some lovely Timbertech composite decking.  We wanted to get that done before the patio project started.  It was supposed to be a fast job.  Take off boards, put on new boards, put on rail, done.
     
That would have been way to easy.  I should have known that their would be complications, it is the norm for our home.  The complications were pretty bad.  The boards coming out of the house are rotted, badly.  So badly that they pretty much disintergrated when we started pulling off the tin cover some put over the to make sure they never dried out.

What this now means is that we have to get another permit because now we have to cut these off, dig 42" holes in the ground to fill with concrete so that we have something to place the posts on that will now be required to support the deck.  The materials for this project were delivered 30 minutes after we discovered this mess and now are in the garage.  One of the cars will have to be in the driveway for the next month or so.  :P

The patio?  Well we dropped  chunk o change for a deposit on the project.  Then found out that the permit process here requires sign off by the health department, possibly our bank, and a pre-inspection from the county.  The turn around time of that is a couple of weeks, which mean the goal of starting that is pushed back to the end of the month.  The contractor laughed at me when I asked if we could have our money back for awhile.  :)  The frustrating thing about this whole permit thing is that this isn't a crazy project.  Expand an existing patio a bit, put in some edging of existing plantar beds, re-fence the area that is nowhere near any property line.  Why the heck they need the health department to make sure the water supply is A-OK boggles.  

Oh well, I hold out hope that we have something done by July 4.  That still leaves a good chunk o summer left for enjoyment. 

Wednesday, May 18, 2011

Photo Theft is so Sketchy. I'm talking to YOU!

This morning I remembered that I had this thing on my blog called statcounter.  I put it on there when I first started the blog and promptly forgot  about it.   I found a link to it this morning when digging around my email.

Statcounter, logs the traffic on your site.  It also tells what images have been downloaded.  I noticed that my chocolate stripes tomato image was rather popular so I got curious and went to google to see what I could see.  What I found is that my photo, taken on my kitchen counter, has been poorly reproduced at an heirloom gardening site  What this tells me is this:  1) This company is sketchy.  2.  This company apparently is unable to grow its own decent chocolate stripes tomatoes.  Every tomato on that plant is a work of art.  Thus I must deduce that since they have had to resort to stealing an image, they are incapable of growing their own fruit and must be getting seeds from who know's where.

I've heard about this sort of thing happening from other tomato growers.  Never thought I would see one of my pictures stolen though.  Shame on you .  If I could get your email link to open I'd tell you directly.  For now I'll have to just call you out on multiple tomato and gardening forums and hope someone gets the message and corrects their mistake.

Here is the link to my post about MY tomato.

Update:  Found an email for them and sent a request to remove the image.  Also posted my complaint at tomatoville where it looks like they may read.

Update #2  Wow, that was fast.  They did not respond to my email, however the photo has now been taken down.   Good.

Update #3 Got a nice email from the site owner.  I'm removing the links to the name.  I'm terrible at holding a grudge.  :)

Sunday, May 15, 2011

Another Wet Weekend

The entire weekend can only be described as gross, weather wise.  Very cold, very wet.  I had really hoped to get the rest of the tomatoes and all of the peppers in this weekend, but they would have been ticked at getting put in that cold goo that is currently my yard.  So I spared them that, though they'll still have to deal with their current cramped quarters another few days.

Plan B was to get the old plum tree down for the fence expansion.  Plan B went out the window with the rain.

Plan C was to get more patio planning done.  That went well.  Our guy we were hoping on came thru and his schedule is looking OK for getting this done soon.  The permit process it turning into a huge headache, but that wasn't unexpected.  I won't be posting any more about THAT in case they read blogs.  Hey they fly their planes over houses to see if you added decks so it isn't that far of a stretch.  :)

We did make a trip out to to a landscape supply place or two.  Good thing we made that trip.  Pavers look different in person than in the catalog.  We changed our minds in what we wanted and this change will likely save us a bit of dough!.  Next stop was to check out decking materials.  I'm interested in the third generation composite stuff that is out there for decks now.  I particularly like the Ipe inspired deck from Fiberon.  Unfortunately I HATE all the deck makers composite posts and railings.  The shiny plastic thing-yuck.  Right now we are leaning towards composite decking and cedar posts with aluminum balusters.

I spent a few hours working on the plumbing research for the pond.  This is WAY more complicated then I originally thought.  We are not going with an Aquascape kit or their typical layout.  I want low maintenance which means skimmer and sieve and UV and bottom drain and about a thousand different valves.  Hubs is going to freak when he see's all this.  I wonder if stealth pond plumbers can be hired.  I got a promotion on Friday.  Seems like that could be a good way to spend the pay raise!

Tuesday, May 10, 2011

Bid Update:

Another bid on the patio project came in last night.  Its frustrating this contractor thing.  How is it that you can give someone a list, a picture of what you want, spend forty five minutes giving details and you still end up with a missing path, two extra columns and the wrong stone?

  Sigh.

Sunday, May 8, 2011

Foundation Planting-Backyard

This spring has been a struggle.  I have been unable to get outside to do anything due to almost the entire month of April being rainy.  The other issue is completely unrelated to rain.  It is the issue of the patio project.  I don't want to plant in areas that are going to be ripped out or improved.  That limitation has messed up my whole flow!  

Last weekend I finally got a break in the weather and was able to get outside and get something done.  The back beds were still too wet.  The ground was still to cold for bringing out the tomatoes but the foundation area at the back of the house was ready for some action!

This area had three large yews removed last year from the area in front of the meters.  They were getting old and ratty looking so we took them out.  For this year, I wanted to put in a mixture of edibles and perennials in this bed.  The plum tree that currently partially shades it is coming out (fall hazard) so I'll have more light soon.


A trip to my favorite nursery started off the project.  I only went for some grasses to cover the meter.  Like most trips to the nursery, that didn't go exactly as planned.  The $82 bill added up fast.  I had a really nice variety to choose from and I leaned towards the newer and cooler which made for higher prices.  Since my plan was to divide each plant to get more for the money, I actually ended up with almost three times as many plants as shown here.  The impulse buy was the Valentine blueberry.  A pink blueberry?  How could I resist.  The most expensive?  The fern leaf peony at $40.  Hey at least I put back the big bird peony that was $117!

Weeding this bed was a quick job thanks to the fall clean-up we did on it last year.  Planting took a little longer thanks to the residual evil lava rocks that are still found in our foundation beds.  I also found a huge crack in the rain barrel that needed to be dealt with. In that same area, I had to again deal with the ugliest bush in the world.  It is trying to make a come back.  I removed the rocks, dug it up again, covered the area with four layers of landscape fabric and then the rocks again.  Take that Ugly!
I took a break from the foundation plantings mid-day to get one of the self watering containers set-up.  I wanted to get the soil and water in it, so that it can start warming up this next week.  Then the tomatoes will be less shocked when I put them in.  The color scheme for this bed was accidental but might end up being kind of cool looking.  I ended up with a lot of red leaved plants.  Pennstemem, red chard, Red cabbage, molten lava amaranth, rhubarb.  Then I also have multiple bright green perennials.  I added a potato leaf tomato just to try and push things a bit (Galinas cherry) and then topped the area with a non-dyed mulch (I'll save the mulch rant for another day).

The end result doesn't currently look like much.  Dividing perennials doesn't tend to give you instant wow factor but I'm pleased with the potential here.  I post pictures in a month to show you were it went.


Tuesday, April 26, 2011

Rain and Contractors-Blah to Both

This spring has been marked by a distinct lack of gardening posts.  Why?  Because I cannot get into the yard.  The entire month of April has been about gloom and cold and rain.  What a contrast to last year!  On those rare days where it actually hasn't rained, the yard has been too gooey to do more than pick up sticks.  I am far far behind and the forecast for the next seven days?  More rain.  Blah

We have made some progress on the patio project in that we have had three companies out to give us a bid.  So far we have received one bid back,  It was from the guy that I didn't like too much.  The bid was reasonable.  Except that he forgot a few things.  Sigh.

 I also got a bid on the pond.  It was an internet bid.  I emailed them pictures of the site and a basic description of what we wanted.  They emailed me back a price of 20K+, without any description of what their most awesome pond plan was whatsoever.  Oh they did say that they know that they are higher but it is because they are better.   Needless to say, they can go soak their heads in one of their most awesome ponds.  I'll pass.

We have another guy coming to look at the site on Friday and hold out hope that the first guy that told us two weeks will come thru for us.  We liked him the best.  The more we consider this project the more I think that I may just do the pond myself.  I'll pay to have it excavated and do the rest.  All of the guys I've talked to so far clearly know the Aquascape variety of pond installation and that's not what I want.  I want low maintenance so I can spend days reading and  gazing at fish instead of vacuuming up their poop.

Edit to say:  Huh, within hours of this post, I got an email that gave more information about the pond design.  So I've decided to remove the pond company name.  Their price however, is still inflated so I'll still be taking a pass.

Friday, April 15, 2011

I Put the Patio Plan on You-tube

The bits and pieces that are the current horror of my patio area have started to creep into my blog entries.  We were going to re-do this area last summer but just lost track of time.  I did nothing to keep it up other than a bit of weeding, because we were going to rip it all out.  It is extraordinary (and mortifying) how much deterioration has occurred in one year.  It is hopefully very temporary.  

We've decided to get this area done, rather than do it ourselves.  Mainly because it is a heck of a lot of work and we want to enjoy our summer.  The first contractor came today.  Here's hoping that he saw such a trashy mess that his bid will come in low because he thinks that we can't afford big inflated projects, lol!

Anyway, I figured out how to get what I have been working on in my landscape program, on to you-tube.  It rough.  I can't figure out the camera angles or how to fix the floating mulch yet.  Oh and the program has no boulders so I can't finish the pond and waterfall either.  Nevertheless, I am still pretty proud that I figured out enough to get this done!  Even if the part that shows the pond did get chopped off.  LOL  Enjoy!
  http://www.youtube.com/watch?v=SfWNUO0lmXU

Sunday, April 10, 2011

Saved: One Coldframe/Watermelon grower

The cold frame I built from scrap lumber last spring saw a lot of use.  I used it as a cold frame all spring.  Then in the summer, I moved it to the watermelon bed and planted melons in it.  This was the first year I ever got edible melons!  In the fall I moved it on top of the lettuce bed to allow me to harvest lettuce well into winter.  Chicago winters are hard though, and when I tried to move the frame to the patio last week I ran into some.....issues.  It fell apart and stabbed me in anger with a rusty staple.  Frames don't apparently like to be dropped over fences.   Luckily I'm not easily diverted from a mission. {*BTW:  Please ignore the horrible rotting fence.  This year we are going to fix it...OK I know I said that last year, but this year I mean it!}

 After raiding the workshop for a few screws and a staple gun, I was off to the races.  Screwing it back into something resembling a structure only took a few moments.  Primarily because I was lazy and did not pre-drill.   I used a lot of the old nail holes.  It seemed to work OK.  Definitely wobbles a bit more than last year though.  Heh.

The next step took me about 40 minutes.  I cut slabs of plastic from the ice rink remnants and stapled them to the frame.  The reason this took so long was that the wind was gusting pretty good and stapling large slabs of plastic in 30 knots of breeze is a bit of work.  If I didn't staple fast enough, a gust would catch the plastic and rip it thru the staples.  Still, it was very easy a garden projects go.  Instead of plastic for the front of it, I used some old row cover.  I did this because I wanted the frame to breathe more than last year.  That side came out so well I may just do the whole thing in row cover next year.  {The giant blob of dirty plastic is thankfully now gone.  My yard was starting to look like it was calling out to junkyard dogs for awhile there.}

Here is the end product.  Stunning patio art it is not, but what it is, is free and an extremely useful place to put plants to harden them off and get them out of the master bedroom.  I put a light bulb in there to deal with the 30 degree nights.  I also have a thermostat in there so that I can closely monitor temperatures on sunny days.  It heats up very fast,  easily hitting sixty degrees on a cold sunny day.  {Yes, that is a big patch of mud right off the patio.  I'm not going to seed it because this patio, along with the fence is history this year!  OK I know I said that last year too, this year is the year!


 The celery, amaranth, leeks and a few potted up chard have been in there all of last week and have really greened up.  Its amazing how much greener plants get in frames like this when compared to growth lights.  

I had the tomato babies in there yesterday and today for a field trip.  It was unseasonably warm and breezy so I thought I'd give their stems a little exercise.  Big storms are getting ready to roll through now, so I'll be bringing them back in for the night.  I don't want to risk any broken stems or hail.  Now when they are looking so good!

Sunday, March 27, 2011

Do Backyard Ice Rinks Kill the Grass? Nope


 This year's backyard ice rink project was proceeded by what I call marital moments.  These moments are sometimes precipitated by one spouse starting a discussion with the words, "I have the coolest idea ever!"  If the other spousal unit has concerns about the scope and/or side effects of said idea, you can end up having a marital moment. or moments.  Heh.

The marital moment surrounding the ice rink issue, was primarily related to the lawn.  My spouse had concerns that putting a 6mm of black plastic on the lawn, filling it with water and then allowing it to freeze into three to ten inches of ice to skate on, might be detrimental to the lawn.  If I'm being honest, I'll admit that I had a twinge of worry about that as well.  However I also had internet research!  My internet research told me the lawn would be fine and in the end, that research allowed me to convince my spouse to give it a shot.  It was such a success that he wants to triple the size of it next year.  He decided that before we even knew the status of the lawn.

I really want to have a rink again next year, so I really should have been more aggressive about getting the two layers of plastic drained and off the lawn.  Afterall, it was mostly melted five weeks ago and the snow has been gone for a good three weeks.  We've had some sun.  No doubt it was heating up the black plastic giving the final blows of death to the poor little blades underneath it, right?  Nope.

 I got my lazy behind out there finally yesterday.  I finished draining it all and pulled the black plastic back to finish drying so that I can fold it up for next year.  Here's the yard.  It is not lovely since its still mostly dormant and the soil is still ice cold.  What is also is not is dead!  There is a bit of yellowing in the one area.  This was the wettest, deepest area.  I'm not worried about it.  There are still tons of green shoots in there.  I fully expect it all to be looking lush within the next three weeks.

 So there you have it.  You lovers of skating should feel free to use my images as evidence, should you experience your own marital moments surround the issue of ice rinks and lawns.  My example shows that even with a far amount of laziness, the lawn can still be just fine!

Saturday, March 12, 2011

Now we're talking!

Whether it was the white tea soak, or the addition of heat, I've had some progress this week.  Now all the tomatoes are up with the exception of Pineapple, Galinas, Aunt Ginny's Purple, Cosmonaut Volkov and Sylvan Gaume.  I'm soaking up another batch of each of those and planting some more today.

Its so funny how each year can be completely different.  Persimmon was very problematic for me to germinate when I first tried it.  I'm using the exact same batch of seed this year and it was the second tomato up and currently the second largest.  Indication I guess of just how many variables are associated with this whole thing!

I've started another tray of seeds.  This time its broccoli, several annuals, lemon, purple and cinnamon basil, fennel, cilantro, leeks, parsley, lettuce, tarragon, one king of the north pepper (needed to refresh seed stock) and the impulse buy for last week, Katya tomato from Adaptive Seeds.

I was drawn to Katja because there is some indication it produces in a bit of shade.  It is also described as quite delicious for an early tomato.  We'll see!  I only planted one cell of it.

Wednesday, March 9, 2011

Off to a Rocky Start!

As is typical for me, I started my tomatoes, peppers, chard, basil and eggplant earlier than is typically recommended for my zone this year.  They all went into seed flats on February 19th.  This early start is part of my annual plan that generally succeeds in netting me produce weeks earlier than my neighbors.  Unfortunately this year I hit a bump in the road. 

There were two major changes to my process this year.  I switched seedling starting soil and I switched the place I bought my seeds at.  Last year, reviewing my notes I had 100% tomato germination at ten days for all varieties.  This year it was zero percent.  I decided to do a few things I normally don't.  I replanted everything after first giving each seed a two hour soak in white tea and I applied bottom heat with a heating pad on medium.

As of today about half my seeds are now up.  It is clearly the soaked seeds that are germinating as I can tell where I planted them.  I suspect that my issues this year are two-fold.  I am unhappy with the soil mix I used (Epsoma Organic seed starting mix).  It is chunky, holds too much moisture and really seems to compact down hard.  It also has developed a fine teal moss-like growth on its surface.  Something I've never had an issue with before.  I also have a sneaking suspicion that the seeds I purchased may be older.  The packets were not dated and they were very bleached and dry looking.  They are sprouting now, so I'm happy about that but this morning I'm glad that I started everything early.  Had I waited until the "right" time, I would already be behind the eight ball.

Monday, February 14, 2011

This Year's Tomato Selection

I've finalized my selections for this year's tomatoes.  Last year I leaned heavily towards unusual colorations.  This year my primary focus is excellent taste and decent productivity.  I also want to make sure that I am not selecting too many late season varieties.  I like to start my salsa consumption in June!  With sunny spots being at a premium, I have to keep my selections limited.  Here is this year's winners:

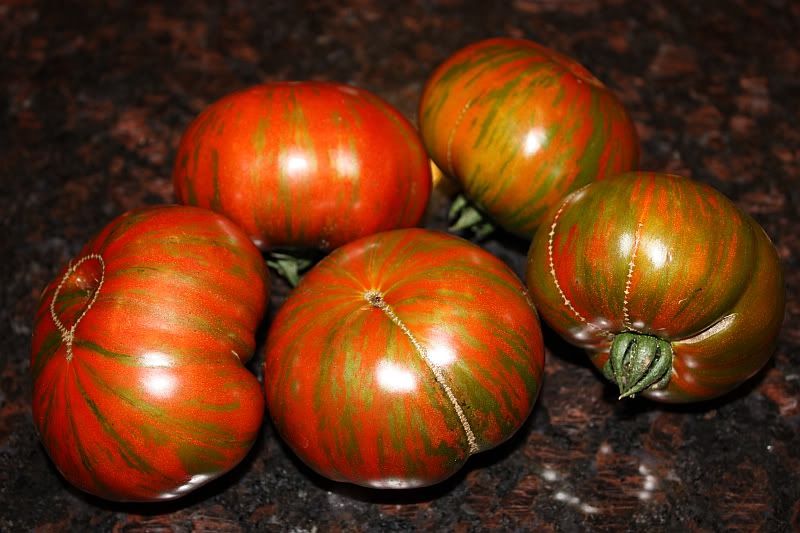
Striped Roman:  Pictured above.  Highly productive, delicious and very meaty.  Superior to paste type tomatoes as far as I am concerned.  It is returning this year after being found to be excellent in 2010.

German Red Strawberry:  New for me this year.  This variety is well known for its excellent production of big hearty shaped, excellent flavored tomatoes.  On the sweet side.

Pineapple:  New for me this year.  Its a bicolor, on the sweet side with big fruits.

Matina:  Returning.  I've now tried both Stupice and Matina for an early.  I think Matina slightly edges out Stupice both for taste and productivity.  I grow this one to assure I have tomatoes before July first.

JD's Special C-Tex  New for me this year.  Described as a purple-black slicer with excellent productivity and outstanding flavor. Midseason.

Black Cherry:  I tried to grow this last year but Bakers Creek sent me mislabeled seed so I'm trying seed from Mariseeds.com this year.  This is the only cherry I'll be growing this year.  Its described as a black with excellent flavor.
NevesxBrandywine: New for me this year.  A midseason red purported to be in the OMG arena for flavor.

 Chocolate Stripes:  A regular in my garden every year.  Delicious, beautiful, productive and healthy.  This year I'll be growing from seeds I saved from a particularly luscious fruit last year.

Aunt Ginny's Purple: Described as a vigorous, pink potato leave of outstanding flavor.  On the sweet side.  This one is new for me this year too.

Anna Russian: Heart shaped pink with good flavor.  New for me.

Teton de Venus: New for me.  Really meaty red heart.  Very sweet,  Very delicious. 

Earl's Faux: New for me.  Mid-season potato leafed pink with good production and excellent taste.

Brave General:  Returning.  Among my most productive last year with 84 pounds yield on a single container plant.  Its a rich tasting mid-season pink.

Dawson's Russian Oxheart:  A big meaty bi-colored heart with good productivity and excellent flavor.  New for me.

Brad's Black Oxheart:  Elongated black hearts with very good flavor and mixed productivity.  Early for this size tomato.  New for me.

Sylvan Gaume: Huge red heart of excellent flavor.  New for me.

Shuntukski VelikanBig Russian red with traditional tomato taste.  New for me.

Midnite In Moscow:  Prolific, early black Russian  of excellent flavor.  New for me.

Galinas Cherry:  I forgot I ordered this one!  Potato leaf, yellow cherry with huge yields and excellent flavor.  Said to do good in cool weather.

Heart Shaped BrandywineReceived this as a gift from Mariseeds.com.  I know nothing about it other than it is a mutation of Brandywine.  Should be fun!

 Well that's the list.  If I end up with more room I'll be adding Vorlon and C. Yugoslavian which were excellent for me last year.  Thanks to Tatiana's Tomato base for helping me remember why I ordered these.  Her site is the best on the web for zonal descriptions of heirloom tomato performance. 


Saturday, February 5, 2011

Backyard Ice Rink

Its bitter cold outside, the yard is covered with snow.  What's there to do outside?  How about ice skate!  I've always wanted to attempt an ice rink in the backyard.  The fear of dead grass and a ton of work is what has held me back.  This year I decided to do some actual research on making one of these and learned that they can be as simple or as complex as you like.  I favored really simple, and it turned out to be just that.

This picture shows the gist of the process.  Find the flattest area of your yard.  This is really really important.  Small slopes make a huge difference in how much water you use.  Our rink is about nine inches deep in the back right corner and three inches in the foreground.  Once you find an area, use a snow shovel to scrape a rectangle out.  Leave about an inch of snow down to protect the grass.  The snow around the edges help provide support for the tarp.  We used a single giant sheet of 6mm plastic that we got from Home Depot.  get white if you can.  Black heats up fast and melts the edges.  Some websites say that you can use only snow to hold up the tarp.  We found that with the depth that we needed, that we needed some boards too.  We just stuck scrap boards in the snow around the perimeter and draped the plastic over it.  

The next step is to add water.  This should be an easy step.  It won't be if you didn't put away your hoses in the fall and they are filled with ice.  We thawed them out in the laundry room sink.  We did not use an outside spigot to fill the rink, we were worried about pipe breakage.  Instead we connected to the spigot just before our water softener and ran the hose out a window stuffed with towels around it to keep the draft out.   It works well, not only for the initial filling but also the homeboni process.

It didn't take that long to fill the rink but you'll want it to freeze for a few days before going on it.  Aim for at least three inches of depth minimum.

Maintenance is simple.  After skating or after snow, shovel the surface.  Then resurface it with another coat of water.  For the smoothest surface, do this in the evening when snow is not blowing around.  Make sure that the water you are using doesn't combine with snow on the surface or you get rough spots.  You can either prevent them by using hot water or just making sure your surface is clear enough.  That's it!  It took us a couple of hours to set up and takes about five minutes of time to resurface after each time we skate.  So worth it and its creating lasting memories of our winter garden.